Have you ever found yourself in need of a table saw but didn't want to spend a fortune on buying one? Well, fear not because with a little bit of creativity and some basic woodworking skills, you can actually make your own table saw. Not only will this save you money, but it will also give you the satisfaction of building something useful with your own two hands. So, grab your tools and let's dive into the fascinating world of DIY table saws.
| Characteristics | Values |
|---|---|
| Motor Power | 1.5 to 3 horsepower |
| Blade Diameter | 10 to 12 inches |
| Rip Capacity | 24 to 36 inches |
| Fence Type | T-square or rack-and-pinion |
| Miter Gauge | Included |
| Dust Collection | Yes |
| Bevel Capacity | 0 to 45 degrees |
| Safety Features | Blade guard, anti-kickback pawls, riving knife |
| Table Material | Cast iron or stamped steel |
| Table Size | 27 to 52 inches in width |
| Weight | 250 to 600 pounds |
| Price Range | $200 to $3000+ |
What You'll Learn
- What are the essential materials and tools needed to make a table saw from scratch?
- What are the basic steps involved in constructing a table saw?
- Are there any safety precautions or measures that need to be taken during the building process?
- Are there any specific measurements or dimensions that need to be followed for the table saw to function effectively?
- Are there any additional features or modifications that can be made to improve the performance of a homemade table saw?
![]()
What are the essential materials and tools needed to make a table saw from scratch?
If you enjoy woodworking and have a knack for DIY projects, you might find it intriguing to make your own table saw from scratch. While it may sound like a challenging task, with careful planning and the right materials and tools, you can successfully build a functional table saw that suits your needs. In this article, we will discuss the essential materials and tools required to make a table saw from scratch.
Materials Needed:
- Motor: One of the most important components of a table saw is the motor. It provides the power needed to spin the saw blade and enable cutting. You can choose a motor that meets your requirements in terms of power and voltage.
- Steel or Aluminum Plates: These plates will be used to create the tabletop and the body of the table saw. Steel or aluminum offer durability and stability, ensuring a sturdy base for your saw.
- Saw Blade: Selecting a high-quality saw blade is crucial as it determines the quality of your cuts. There are various types of saw blades available, including rip blades, crosscut blades, and combination blades. Choose the appropriate blade based on the type of cuts you intend to make.
- Miter Gauge: A miter gauge helps in making accurate angled cuts and crosscuts. It is essential for precision woodworking, so make sure to include this component in your table saw build.
- Fence System: The fence acts as a guide for making parallel cuts. It is crucial for maintaining accuracy and ensuring uniformity in your cuts. Consider using a high-quality fence system that can be adjusted and locked securely in place.
- Safety Features: Safety should be a top priority when building your own table saw. Make sure to include features such as a blade guard, riving knife, and anti-kickback pawls to prevent accidents and injuries.
Tools Needed:
- Welding Machine: If you opt for a steel body, welding will be necessary to join the steel plates together securely. A welding machine allows you to create strong and durable connections.
- Power Tools: You will require various power tools such as a jigsaw, circular saw, drill, and router for cutting and shaping the steel or aluminum plates. These tools help in creating precise cuts and holes required for assembling the table saw.
- Clamps: Clamps are essential for holding the pieces in place while welding or drilling. They ensure stability and accuracy during the construction process.
- Measuring Tools: Accurate measurements are key to building a functional table saw. You will need measuring tools such as a tape measure, square, and level to ensure precise cuts and alignments.
- Safety Gear: It is crucial to protect yourself during the construction process. Wear safety glasses, gloves, and ear protection to prevent any unwanted accidents or injuries.
Building a table saw from scratch requires careful planning, attention to detail, and the right materials and tools. It is recommended to have prior experience with woodworking and using power tools before undertaking this project. Following step-by-step guides and seeking guidance from experienced woodworkers can also be beneficial. With dedication and patience, you can create a custom table saw that fits your woodworking needs perfectly.
Optimal Height for a Miter Saw Bench: Finding the Perfect Work Surface Elevation
You may want to see also
![]()
What are the basic steps involved in constructing a table saw?
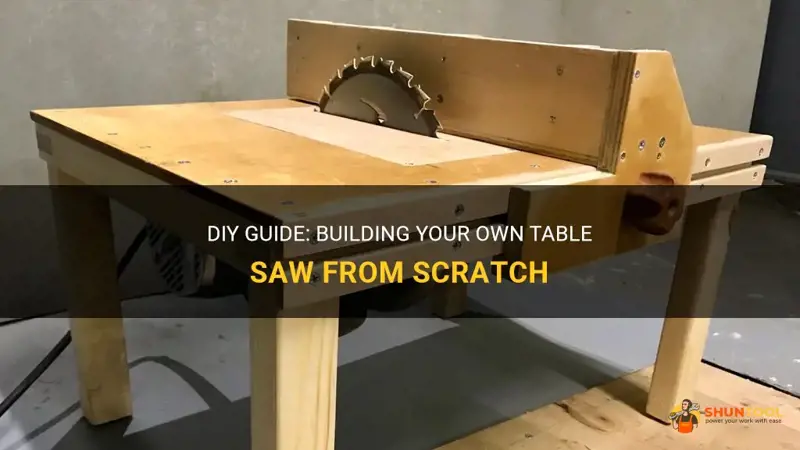
Constructing a table saw can be a rewarding project for woodworking enthusiasts. It allows you to customize the saw to suit your specific needs and can even save you money compared to buying a pre-made table saw. While the process may seem complex, it can be broken down into a few basic steps. In this article, we will explore the steps involved in constructing a table saw.
Gather the necessary materials and tools:
Before starting the construction, it is important to gather all the materials and tools required for the project. This includes plywood for the table and base, a motor, a blade, a miter gauge, a fence, and various nuts, bolts, and screws. You will also need tools such as a saw, a drill, a screwdriver, and a tape measure.
Design the table saw:
The first step in constructing a table saw is to design the layout of the saw. This involves determining the size and shape of the table, as well as the placement of the motor, blade, miter gauge, and fence. Consider factors such as the size of the materials you will be cutting, the available space in your workshop, and any additional features you want to incorporate into the table saw.
Build the table and base:
Once you have a design in mind, it's time to start building the table saw. Begin by cutting the plywood for the table and base according to your measurements. Next, assemble the base using screws and reinforce it with additional support if needed. Attach the table to the base, making sure it is securely fastened.
Install the motor and blade:
Mount the motor to the table saw base, ensuring it is aligned properly. Connect the motor to the blade using a belt or direct drive system, depending on the type of motor you are using. Install the blade, making sure it is centered and secure. It is important to follow the manufacturer's instructions for installing the motor and blade to ensure safety and optimal performance.
Add the miter gauge and fence:
Attach the miter gauge to the table, allowing it to slide smoothly. The miter gauge is used for making angled cuts. Install the fence on the front of the table, ensuring it is parallel to the blade. The fence is used for making straight cuts. Both the miter gauge and fence should be adjustable to allow for accurate and precise cuts.
Fine-tune and test the table saw:
Once all the components are in place, make any necessary adjustments to ensure everything is aligned and functioning properly. Check the alignment of the blade and the miter gauge to ensure they are square to the table. Test the table saw by making some test cuts on scrap wood, adjusting the settings as needed.
Remember that safety should be your top priority when constructing and using a table saw. Always wear appropriate safety gear, such as safety glasses and hearing protection, and follow all safety guidelines and precautions outlined in the instruction manual of your motor and blade.
By following these basic steps, you can successfully construct your own table saw. Remember to take your time and double-check your work to ensure a safe and accurate table saw. Enjoy the satisfaction of using a tool that you built yourself, customized to meet your woodworking needs.
Revamp your Makita Circular Saw with these Easy Rewiring Tips
You may want to see also
![]()
Are there any safety precautions or measures that need to be taken during the building process?
Building any structure, whether it be a small shed or a large commercial building, requires careful planning and execution to ensure safety throughout the process. There are several safety precautions and measures that need to be taken to mitigate the risks associated with construction. This article will outline some of the key safety considerations that should be taken into account during the building process.
- Risk Assessment: Before starting any construction project, it is essential to conduct a thorough risk assessment. This involves identifying potential hazards and assessing the level of risk associated with each one. By understanding the risks involved, appropriate measures can be put in place to prevent accidents and injuries. For example, if working at heights is necessary, safety measures such as scaffolding or harnesses should be utilized to minimize the risk of falls.
- Personal Protective Equipment (PPE): It is important for all workers on a construction site to wear appropriate PPE to protect themselves from potential hazards. This may include hard hats, safety goggles, steel-toed boots, and high-visibility clothing. PPE should be provided to all workers and should be regularly inspected to ensure it is in good condition.
- Training and Education: Proper training and education are key to ensuring that individuals working on a construction site are aware of and understand the necessary safety measures. Workers should be trained in the correct use of equipment, handling of materials, and emergency procedures. Regular safety meetings and refresher courses should be conducted to reinforce safe working practices.
- Construction Site Organization: A well-organized construction site is essential to maintaining safety. This includes clearly marked walkways and signage, designated storage areas for materials and equipment, and a proper waste management system. By keeping the site organized, the risk of accidents caused by tripping or slipping can be minimized.
- Control of Hazardous Materials: During the construction process, it is common for hazardous materials such as paints, solvents, or asbestos to be present. It is crucial to handle and dispose of these materials in accordance with relevant regulations. Proper safety measures, such as the use of ventilated areas and personal protective equipment, should be implemented when working with hazardous substances.
- Structural Integrity: Ensuring the structural integrity of a building is an important aspect of construction safety. It is essential to follow building codes and standards to ensure that the structure is designed and built to withstand potential environmental hazards such as earthquakes or high winds. Regular inspections and quality control checks should be conducted throughout the construction process to ensure that the building is being constructed to the required standards.
In conclusion, safety precautions and measures are vital during the building process to protect workers, the public, and the integrity of the structure. Conducting a thorough risk assessment, providing appropriate PPE, training and educating workers, maintaining an organized site, handling hazardous materials safely, and ensuring structural integrity are all essential steps in promoting a safe construction site. By following these precautions, construction projects can be completed with minimal risk and maximize the safety of all involved.
The Decibel Level of a Circular Saw: How Loud is it?
You may want to see also
![]()
Are there any specific measurements or dimensions that need to be followed for the table saw to function effectively?
Yes, there are specific measurements and dimensions that need to be followed for a table saw to function effectively. Table saws are versatile and powerful tools, but they can also be potentially dangerous if not used properly. Here are some important considerations when setting up and using a table saw.
- Table Height: The height of the table saw should be set so that it is comfortable for the user to operate. Ideally, the table should be set at a height that allows the user to stand comfortably with their arms at a 90-degree angle. This will help reduce strain and fatigue during long periods of use.
- Fence Alignment: The fence on a table saw is used to guide the workpiece during cutting. It is crucial that the fence is properly aligned to ensure accurate and safe cuts. To check the alignment, place a straight piece of wood against the fence and adjust it until it is parallel to the blade. Use a square to verify that the fence is indeed parallel to the blade.
- Blade Height: The height of the blade should be set to the appropriate depth for the material being cut. As a general rule, the blade should extend about 1/8 to 1/4 of an inch above the workpiece. This will help reduce the risk of kickback and produce clean, accurate cuts.
- Blade Angle: Table saws are capable of making beveled cuts by tilting the blade at an angle. The angle of the blade should be set according to the desired bevel cut. It is important to check the angle with a protractor or angle gauge to ensure accuracy.
- Splitter and Riving Knife: A splitter or riving knife is an essential safety feature on a table saw. It prevents the workpiece from pinching the blade and causing kickback. Make sure the splitter or riving knife is properly aligned with the blade and adjusted to the appropriate height for the material being cut.
- Push Sticks and Featherboards: To ensure safe operation, always use push sticks or featherboards when feeding the workpiece through the table saw. Push sticks provide a safe and controlled way to push the workpiece past the blade, while featherboards apply pressure against the workpiece to keep it against the fence and table.
- Dust Collection: Table saws can generate a significant amount of sawdust and debris. To maintain a clean and safe working environment, connect a dust collection system or use a shop vacuum to remove the dust as it is produced. This will help prevent the dust from clogging the blade and obstructing your view of the cut.
- Personal Protective Equipment (PPE): When using a table saw, it is important to wear appropriate personal protective equipment. This includes safety glasses or goggles to protect your eyes from flying debris, ear protection to reduce the noise generated by the saw, and a dust mask to prevent inhalation of sawdust.
In conclusion, following specific measurements and dimensions when setting up and using a table saw is crucial for both safety and effectiveness. From adjusting the table height to aligning the fence, ensuring the proper blade height and angle, and using necessary safety features and protective equipment, attention to detail and accuracy will result in accurate and safe cuts. Always refer to the manufacturer’s instructions and guidelines to ensure proper setup and use of your specific table saw model.
Building a Circular Saw Bench: A Step-by-Step Guide
You may want to see also
![]()
Are there any additional features or modifications that can be made to improve the performance of a homemade table saw?
A homemade table saw can be a great addition to your workshop if you're on a budget or enjoy building your own tools. However, like any tool, it can benefit from some additional features or modifications to improve its overall performance. In this article, we will explore some ideas that could help take your homemade table saw to the next level.
- Upgrading the Blade: One of the easiest and most effective ways to improve the performance of your homemade table saw is to upgrade the blade. A high-quality blade with the right tooth count for your intended use can significantly improve the quality of your cuts. Look for blades specifically designed for the type of material you'll be cutting, whether it's hardwood, softwood, or plywood.
- Adding a Fence: A fence is an essential accessory for any table saw, as it ensures straight and accurate cuts. If your homemade table saw doesn't already have a fence, consider adding one. You can either purchase a pre-made fence or build your own using a straight piece of wood or aluminum extrusion. Make sure the fence is securely attached and aligned parallel to the blade for the best results.
- Building a Zero-Clearance Insert: A zero-clearance insert is a removable plate that sits flush with the table saw's surface around the blade. It helps prevent tear-out on the underside of your workpiece by providing support right up to the blade's edge. You can either purchase a zero-clearance insert or make one yourself using a piece of plywood or another suitable material.
- Installing a Riving Knife or Splitter: A riving knife is a safety device that helps prevent kickback by keeping the workpiece from closing in on the back of the blade. If your homemade table saw doesn't already have one, consider adding a riving knife or a splitter. These devices are typically mounted behind the blade and move up and down with it, ensuring that the cut is supported at all times.
- Adding Dust Collection: Dust and debris can quickly accumulate when using a table saw, leading to decreased visibility and potential health hazards. Adding a dust collection system to your homemade table saw can help keep your workspace clean and safe. You can either build your own dust collection system using a shop vacuum or purchase a dedicated dust collector for better efficiency.
- Improving Stability: A stable and secure table saw is essential for accurate and safe cutting. If your homemade table saw is wobbly or lacks stability, consider reinforcing the base or adding additional support. You can use bracing or cross-members for added rigidity or invest in a sturdy base made from steel or another strong material.
These are just a few ideas to consider when looking to improve the performance of your homemade table saw. Whether it's upgrading the blade, adding a fence, or improving stability, these modifications can make a noticeable difference in the quality of your cuts and overall usability. Remember to prioritize safety and consult professional resources or experienced woodworkers if you're unsure about any modifications or adjustments. With the right enhancements, your homemade table saw can rival and perform just as well as a professionally-made one.
Effective Ways to Minimize Sawdust from Your Circular Saw
You may want to see also
Frequently asked questions
Yes, it is possible to make a table saw at home. However, it requires certain tools, skills, and safety precautions. It is important to research and follow detailed plans or tutorials to ensure the table saw is constructed properly and safely.
To make a table saw, you will need a sturdy base or frame, a circular saw or a motor, a blade and arbor assembly, a fence to guide the wood being cut, a miter gauge for angled cuts, and various hardware such as bolts, screws, and nuts. Additional materials may be required based on the design or features you want for your homemade table saw.
The assembly process will vary depending on the design you choose for your homemade table saw. Generally, you will need to mount the circular saw or motor onto the base or frame securely. Attach the blade and arbor assembly, making sure it is aligned properly. Install the fence and miter gauge to ensure accurate cuts. Finally, ensure all components are securely fastened and that safety features such as blade guards and anti-kickback devices are in place.
Safety should be a top priority when making a table saw at home. Always wear appropriate safety gear such as safety glasses and ear protection when operating the table saw. Ensure the blade guard and anti-kickback devices are functioning and properly adjusted. Follow proper techniques and precautions when using the table saw, such as avoiding loose-fitting clothing and keeping fingers and hands away from the blade.
Yes, you can modify or improve your homemade table saw based on your specific needs and preferences. Some common modifications or improvements may include adding a dust collection system to keep the workspace clean, upgrading the fence system for increased accuracy, or adding a larger table surface for better support and stability. It is important to research and follow proper guidelines and safety measures when making any modifications to your table saw.