Drilling a screw into wood may seem like a straightforward task, but it's actually a skill that requires precision and technique. Whether you're a DIY enthusiast or a professional carpenter, understanding the proper steps to drill a screw into wood can make all the difference in your project's success. From choosing the right drill bit to ensuring the correct depth and angle, this process is a delicate dance between power and finesse. So, grab your power tools and join us as we delve into the art of drilling a screw into wood.
| Characteristics | Values |
|---|---|
| Type of Screw | Wood Screw |
| Screw Size | Determined by the thickness of the wood and the weight it needs to support |
| Drill Bit Size | Slightly smaller than the screw diameter |
| Pre-drilling | Required to prevent the wood from splitting |
| Depth of Hole | The length of the screw (minus the head) |
| Speed of Drill | Moderate to avoid overheating the wood |
| Screwdriver Type | Phillips or Robertson (square) head |
| Torque | Tighten until the screw is flush with the surface, but avoid overtightening |
| Screw Material | Determined by the type of wood and environment |
| Wood Type | Varies depending on the project and desired aesthetic |
| Pilot Holes | Used when drilling into hardwood or when driving near the edge of the wood |
What You'll Learn
- What tools do you need to drill a screw into wood?
- What size drill bit should you use for different types of screws and wood?
- What precautions should you take when drilling a screw into wood to prevent splitting or cracking?
- Should you pre-drill a hole before inserting a screw into wood If so, when is it necessary?
- What techniques can you use to ensure that the screw is drilled in straight and flush with the surface of the wood?
![]()
What tools do you need to drill a screw into wood?
When it comes to drilling a screw into wood, there are a few essential tools that you will need to have on hand. These tools will make the process much easier and ensure that your screws are properly secured in the wood. In this article, we will discuss the tools you need and provide a step-by-step guide on how to drill a screw into wood.
- Power drill: The most important tool you will need is a power drill. This will allow you to quickly and efficiently drill the hole for your screw. It is recommended to use a drill with adjustable speed settings so you can control the drilling speed based on the type of wood you are working with.
- Drill bit: The drill bit is the part of the drill that actually removes the material to create the hole. For drilling screws into wood, you will need a drill bit that is specifically designed for wood. The size of the drill bit should be slightly smaller than the diameter of the screw you will be using. This will ensure a tight fit and prevent the wood from splitting.
- Screwdriver bit: Once you have drilled the hole, you will need a screwdriver bit that is compatible with the type of screw you are using. There are different types of screwdriver bits available, including Phillips, slotted, and hex. Make sure to use the appropriate bit for your screw to ensure a secure connection.
- Screw: Lastly, you will need the screw itself. Choose a screw that is appropriate for the size and thickness of the wood you are working with. It is important to use screws that are long enough to provide a secure hold but not so long that they will poke out the other side of the wood.
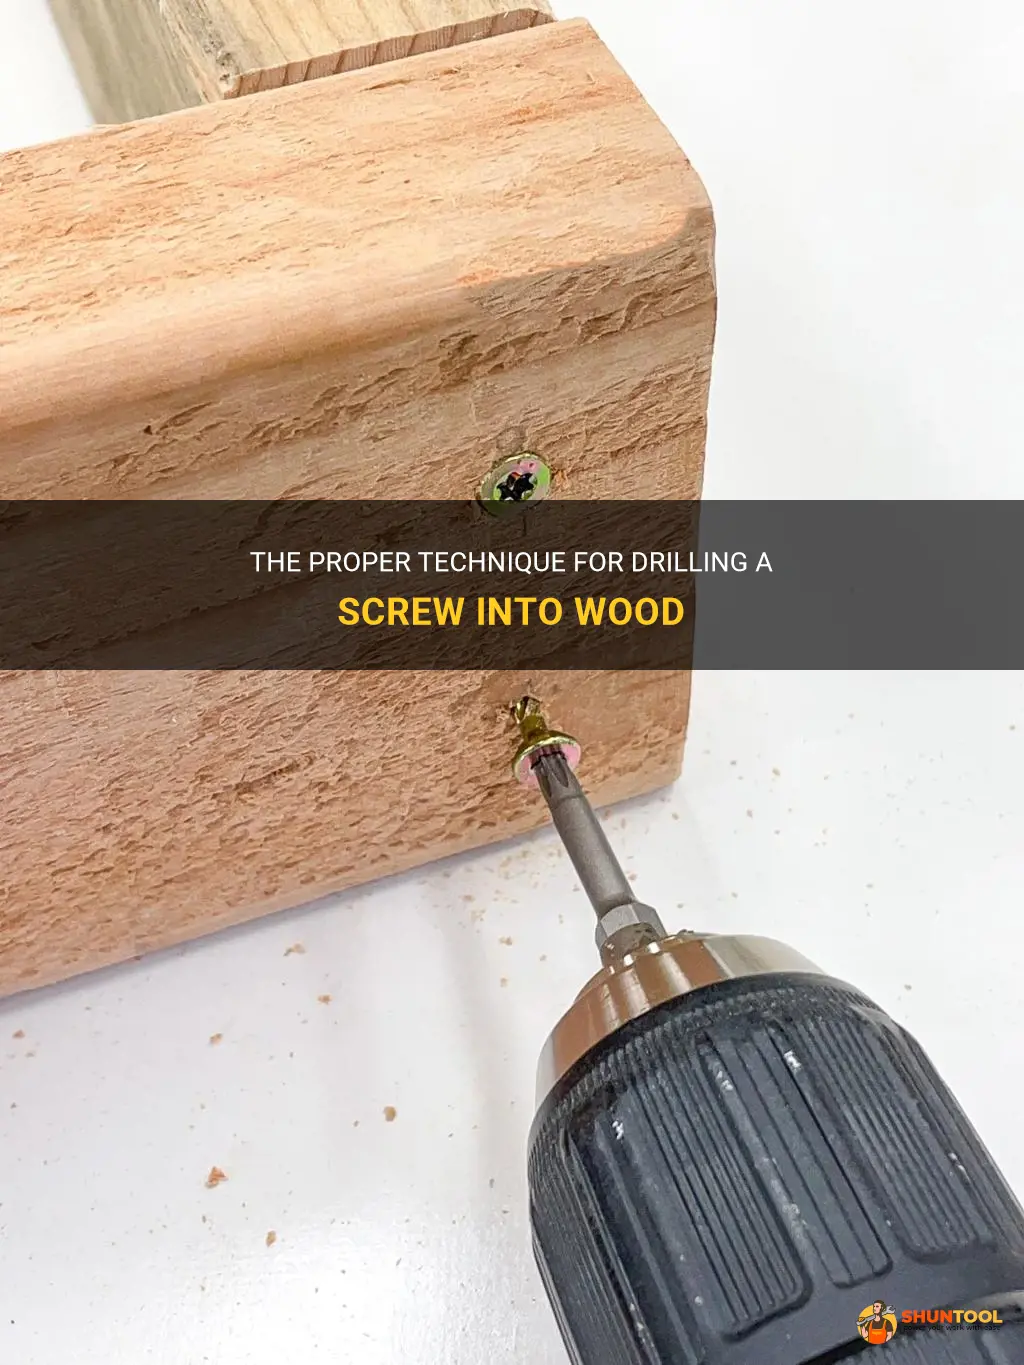
Now that you have gathered the necessary tools, here is a step-by-step guide on how to drill a screw into wood:
Step 1: Measure and mark the location where you want to drill the hole for the screw. Use a tape measure or ruler to ensure accuracy.
Step 2: Attach the appropriate drill bit to the power drill. Make sure it is securely in place.
Step 3: Set the speed of the power drill to a suitable level for the type of wood you are drilling into. Start with a lower speed and gradually increase if needed.
Step 4: Place the tip of the drill bit on the marked spot and apply steady pressure to the drill. Start drilling slowly to create a pilot hole.
Step 5: Once the pilot hole is created, increase the speed of the drill and continue drilling to the desired depth. Be sure to keep the drill steady and avoid applying too much pressure, as this can cause the wood to splinter.
Step 6: Once the hole is drilled, remove the drill bit from the power drill and replace it with the screwdriver bit that is compatible with your screw.
Step 7: Place the screw into the hole and begin turning it clockwise using the power drill. Apply gentle pressure until the screw is fully secured in the wood. Be careful not to overtighten, as this can strip the screw or damage the wood.
By following these steps and using the necessary tools, you can easily drill a screw into wood. Remember to always wear protective eyewear and take proper safety precautions when using power tools. With a little practice, you will become proficient in drilling screws and completing woodworking projects.
The Ultimate Guide to Chipping Concrete with a Hammer Drill
You may want to see also
![]()
What size drill bit should you use for different types of screws and wood?
When it comes to drilling holes for screws in wood, it's important to use the correct size drill bit. Using the wrong size bit can result in a loose or stripped screw, or even damage to the wood. In this article, we will explore the different sizes of drill bits and how to choose the right one for different types of screws and wood.
Size of Drill Bits:
Drill bits come in various sizes, typically in both metric and imperial measurements. The size of a drill bit is determined by its diameter, which is usually indicated in millimeters (mm) or inches (in). The standard sizes range from 1/16 inch to 1 inch or 1.5 mm to 25 mm, with increments of 1/64 inch or 0.5 mm.
Choosing the Right Drill Bit:
To choose the correct drill bit size for a screw, you need to consider both the diameter of the screw and the type of wood you are working with. The general rule of thumb is that the drill bit should be slightly smaller than the diameter of the screw, allowing for easy insertion while still providing enough grip for a secure hold.
Pilot Holes:
In some cases, it is necessary to create a pilot hole before driving a screw into the wood. A pilot hole helps to prevent the wood from splitting and allows for easier insertion of the screw. The size of the pilot hole should be slightly smaller than the root diameter of the screw. You can refer to a screw size chart to determine the appropriate pilot hole size.
Screws for Softwoods:
When working with softwoods such as pine or fir, it is recommended to use a drill bit that is slightly smaller than the screw diameter. For example, if you are using a 1/4 inch screw, you can use a 3/16 inch drill bit or a metric equivalent. This ensures a tight fit and reduces the risk of splitting the wood.
Screws for Hardwoods:
Hardwoods such as oak or maple require a slightly larger pilot hole to accommodate the denser material. Using a drill bit that matches the screw diameter is generally recommended. For example, if you are using a 1/4 inch screw, you can use a 1/4 inch drill bit or a metric equivalent. This provides enough space for the screw to penetrate the wood without causing any damage.
Screws for Particle Board or MDF:
Particle board and medium-density fiberboard (MDF) are composed of compressed wood fibers, which are more prone to splitting. Therefore, it is crucial to use a pilot hole for these materials. The drill bit size should be slightly smaller than the screw diameter to create a solid grip without causing any damage.
Tapered Drill Bits:
In some cases, you may encounter tapered drill bits specifically designed for woodworking projects. These drill bits gradually increase in size from the tip to the shank, which allows for a smooth and snug fit for screws. Tapered drill bits are commonly used for countersinking screw heads or creating a flush surface.
In conclusion, choosing the right size drill bit for screws and wood is essential for a secure and professional finish. By matching the drill bit diameter to the screw size and considering the type of wood, you can ensure a proper fit and minimize the risk of damage. Always refer to a screw size chart and consider using pilot holes when working with denser or more delicate materials.
Hammer Drills vs. Impact Drills: Are They the Same?
You may want to see also
![]()
What precautions should you take when drilling a screw into wood to prevent splitting or cracking?
Drilling screws into wood is a common task for many DIY projects. While it may seem like a straightforward process, it is important to take precautions to prevent the wood from splitting or cracking. Splitting wood can weaken the structure and compromise the integrity of your project. By following a few simple steps, you can ensure a successful screw placement without any damage to the wood.
Choose the Right Screw Size and Type:
The first step is to select the right screw for the job. The size and type of screw you use will depend on the thickness and density of the wood, as well as the weight or load the screw will be supporting. Using a screw that is too big or too long can increase the risk of splitting. It is essential to match the screw size and type to the specific project requirements.
Pre-drill the Hole:
Pre-drilling a hole before inserting a screw can significantly reduce the risk of splitting wood. This is particularly important when working with hardwoods or dense materials. The pre-drilled hole should be slightly smaller than the screw's diameter, allowing the threads to grip the wood securely without causing any damage. To prevent the drill bit from slipping or wandering off-center, it is recommended to use a center punch and hammer to create a starting point for the drill bit.
Use Pilot Holes for Hardwoods:
For harder woods, such as oak or maple, it is advisable to use pilot holes before inserting the screw. A pilot hole is a small-diameter hole, usually slightly smaller than the screw's core diameter, drilled into the wood before screw installation. Pilot holes help guide the screw into the wood and reduce the chance of splitting or cracking.
Countersink the Screw:
When drilling screws into wood, it is essential to countersink the screw heads. Countersinking involves creating a recessed area for the screw head so that it is flush with or slightly below the wood surface. Countersinking prevents the screw from applying excessive pressure on the wood, reducing the risk of splitting or cracking. A countersink bit can be used to create the recessed area before screw insertion.
Apply Lubrication:
Applying lubrication, such as soap or wax, on the screw threads can make the driving process smoother and reduce friction. This can help prevent the wood from splitting or cracking, especially when drilling screws near the edges of the wood.
Avoid Over-tightening:
Over-tightening screws can put excessive pressure on the wood, leading to splitting or cracking. It is important to use proper torque and avoid applying excessive force while driving the screw. Using a torque-limiting screwdriver or drill with an adjustable clutch can help prevent over-tightening and minimize the risk of wood damage.
Choose the Right Screw Placement:
Carefully plan the screw placement to avoid drilling too close to the edge of the wood. Wood is more prone to splitting and cracking near the edges because it is more vulnerable and less supported. By placing screws a safe distance from the edge, you can minimize the risk of splitting and maintain the structural integrity of the wood.
In conclusion, taking the necessary precautions when drilling screws into wood can help prevent splitting or cracking. Selecting the right screw size and type, pre-drilling the hole, using pilot holes for hardwoods, countersinking the screw, applying lubrication, avoiding over-tightening, and choosing the right screw placement are all essential steps to ensure a successful screw installation without any damage to the wood. By following these precautions, you can confidently complete your woodworking projects with a strong and secure screw connection.
The Ultimate Guide to Removing Thinset with a Hammer Drill
You may want to see also
![]()
Should you pre-drill a hole before inserting a screw into wood? If so, when is it necessary?
Pre-drilling a hole before inserting a screw into wood is a recommended practice in many cases. It helps to ensure a smooth and secure insertion of the screw while minimizing the risk of splitting the wood. However, pre-drilling is not always necessary, and knowing when to pre-drill is important to avoid unnecessary work and achieve optimal results.
- Hardwoods: Hardwood types such as oak, maple, and birch are denser and have a higher chance of splitting when a screw is inserted directly without pre-drilling. When working with hardwoods, it is advisable to pre-drill a hole using a drill bit slightly smaller than the screw diameter. This allows the screw to grip the wood securely without causing any damage.
- Near edges: When driving a screw close to the edge of a board, pre-drilling is essential to prevent the wood from splitting. The risk of splitting is higher here due to the reduced thickness of wood near the edge. Pre-drilling ensures that the screw is held securely in place without causing any cracks or breaks.
- Large screws: When working with large screws (such as deck screws), pre-drilling is necessary to create a clearance hole for the screw threads. This prevents the wood from splitting under the pressure exerted by the screw during insertion. It is recommended to use a drill bit slightly larger than the screw's shank diameter.
- Hardened wood: Wood that has hardened over time, like old and dry lumber, can be more prone to splitting. Pre-drilling is recommended in these cases, especially if the wood is brittle or shows signs of aging. By pre-drilling, you create a path for the screw to follow with minimal resistance, reducing the risk of splits.
- In case of knots: Knots in wood can present challenges when inserting screws. The density and irregularities of knots can cause the wood to split, especially if the knot is near the surface. Pre-drilling a hole before inserting a screw near a knot can help to avoid splitting and ensure a secure connection.
- Softwoods: Softwoods such as pine, cedar, and fir are generally less prone to splitting compared to hardwoods. In most cases, pre-drilling is not necessary when working with softwoods unless the wood is particularly dry or brittle.
- Small screws: When using small screws with a diameter smaller than 1/8 inch, pre-drilling is usually not necessary. The risk of splitting the wood is low, and the small screws can usually be driven into the wood directly without causing any damage.
- Self-drilling screws: Some screws come with built-in drilling tips that eliminate the need for pre-drilling. These self-drilling screws have a pointy tip that can create its pilot hole while being driven into the wood. These screws are designed for convenience and can be used without pre-drilling in most cases.
In conclusion, pre-drilling a hole before inserting a screw into wood is generally recommended, especially when working with hardwoods, near edges, using large screws, or when dealing with hardened wood or knots. Pre-drilling reduces the risk of splitting and ensures a secure connection. However, pre-drilling is not always necessary, especially when working with softwoods, small screws, or using self-drilling screws. It is important to assess the situation and material before deciding whether pre-drilling is required.
Should You Replace the Hammer Inside Your Hammer Drill? Key Factors to Consider
You may want to see also
![]()
What techniques can you use to ensure that the screw is drilled in straight and flush with the surface of the wood?
When it comes to woodworking, it's important to ensure that screws are drilled in straight and flush with the surface of the wood. This not only makes the finished product look professional, but it also ensures that the joint is secure and long-lasting. There are several techniques you can use to achieve this.
First and foremost, it's crucial to have the right tools for the job. A power drill with a variable speed control and a driver bit specifically designed for the type of screw you are using are essential. Additionally, having a drill press or a drilling guide can greatly enhance accuracy and consistency.
Before drilling, it's important to mark the location of the screw hole. Using a square or a straight-edge, draw a line across the wood where you want the screw to go. This will serve as your guide throughout the drilling process. It's worth noting that if you're working with hardwood or dense wood, pre-drilling a pilot hole can prevent splitting or cracking.
Once the hole is marked, it's time to start drilling. Place the drill bit in the center of the mark and apply light pressure to start drilling. Gradually increase the speed of the drill while maintaining a steady downward force. It's important to keep the drill perpendicular to the surface of the wood to ensure a straight hole.
As you approach the desired depth, reduce the drilling speed to prevent over-drilling. This is especially important when working with softer woods, as they can easily be damaged if too much force is applied. It's a good practice to periodically withdraw the drill to remove wood chips and debris from the hole, as this can affect the flushness of the screw once it's inserted.
After the hole is drilled, it's time to insert the screw. Make sure the screw is properly aligned with the hole and start turning it by hand to prevent cross-threading. Once the screw is started, you can use a power drill or a screwdriver to drive it in further. Take care not to overtighten the screw, as this can strip the hole or damage the wood.
To ensure that the screw is flush with the surface of the wood, you can use a countersink or a counterbore bit. These bits create a tapered or recessed hole that allows the screw head to sit below the surface. By adjusting the depth of the bit, you can control the depth at which the screw sits, ensuring a clean and flush finish.
In summary, there are several techniques you can use to ensure that screws are drilled in straight and flush with the surface of the wood. Having the right tools, marking the location of the hole, drilling straight and at the right depth, and using countersink or counterbore bits are all crucial steps in achieving a professional-looking result. By following these techniques, you can ensure that your woodworking projects are not only aesthetically pleasing but also durable and secure.
Ridgid Hammer Drill Review: Is it Worth the Investment?
You may want to see also
Frequently asked questions
The type of drill bit you should use depends on the type of screw you are using. For most wood screws, it is recommended to use a countersink bit that matches the size of the screw head. This will create a recessed hole for the screw head to sit flush with the surface of the wood.
The depth of the hole for the screw will depend on the length of the screw and the thickness of the wood. As a general rule, the hole should be slightly shorter than the length of the screw to ensure a secure fit. To determine the correct depth, you can mark the screw with a piece of tape or use a depth stop on your drill to prevent drilling too deep.
To prevent the wood from splitting when drilling a screw, first, make sure you are using the correct size drill bit and screw size for the wood. It is also helpful to pre-drill a small pilot hole before inserting the screw. This will create a guide for the screw and reduce the risk of splitting the wood. Additionally, you can lubricate the screw with a bit of soap or wax to make it easier to drive into the wood without causing damage.